Using Tensorflow Object Detection to do Pixel Wise Classification
Priya Dwivedi
24 Apr 2018
•
3 min read
In the past, I have used Tensorflow Object Detection API to implement object detection with the output being bounding boxes around different objects of interest in the image. For more please look at my article. Tensorflow recently added new functionality and now we can extend the API to determine pixel by pixel location of objects of interest. See example below:

The code is on my Github.## Instance Segmentation
Instance segmentation is an extension of object detection, where a binary mask (i.e. object vs. background) is associated with every bounding box. This allows for more fine-grained information about the extent of the object within the box.
So when would we need this extra granularity? Some examples that come to mind are:
-
Self Driving Cars — May need to know exactly where another car is on the road or the location of a human crossing the road
-
Robotic systems — Robots that say join two parts together will perform better if they know the exact locations of the two parts
There are several algorithms that implement instance segmentation but the one used by Tensorflow Object Detection API is Mask RCNN.
Mask RCNN
Lets start with a gentle introduction to Mask RCNN.
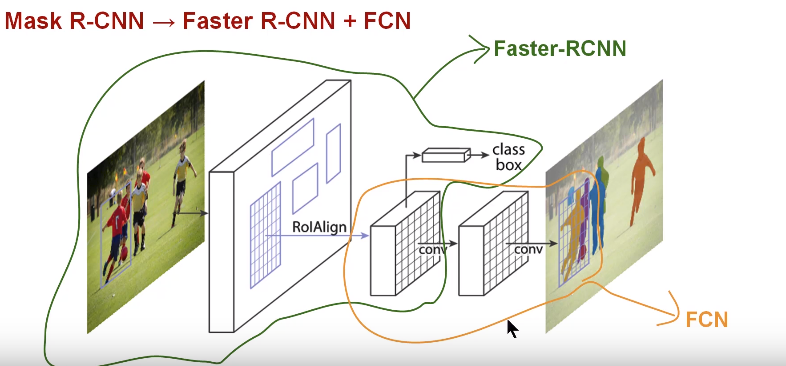
Faster RCNN is a very good algorithm that is used for object detection. Faster R-CNN consists of two stages. The first stage, called a Region Proposal Network (RPN), proposes candidate object bounding boxes. The second stage, which is in essence Fast R-CNN, extracts features using RoIPool from each candidate box and performs classification and bounding-box regression. The features used by both stages can be shared for faster inference.
Mask R-CNN is conceptually simple: Faster R-CNN has two outputs for each candidate object, a class label and a bounding-box offset; to this we add a third branch that outputs the object mask — which is a binary mask that indicates the pixels where the object is in the bounding box. But the additional mask output is distinct from the class and box outputs, requiring extraction of much finer spatial layout of an object. To do this Mask RCNN uses the Fully Convolution NetworkMask RCNN Paper (FCN) described below.
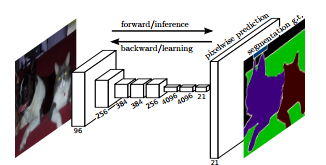
FCN is a popular algorithm for doing semantic segmentation. This model uses various blocks of convolution and max pool layers to first decompress an image to 1/32th of its original size. It then makes a class prediction at this level of granularity. Finally it uses up sampling and deconvolution layers to resize the image to its original dimensions.
So in short we can say that Mask RCNN combines the two networks — Faster RCNN and FCN in one mega architecture. The loss function for the model is the total loss in doing classification, generating bounding box and generating the mask.
Mask RCNN has a couple of additional improvements that make it much more accurate than FCN. You can read more about them in their paper.
Implementation
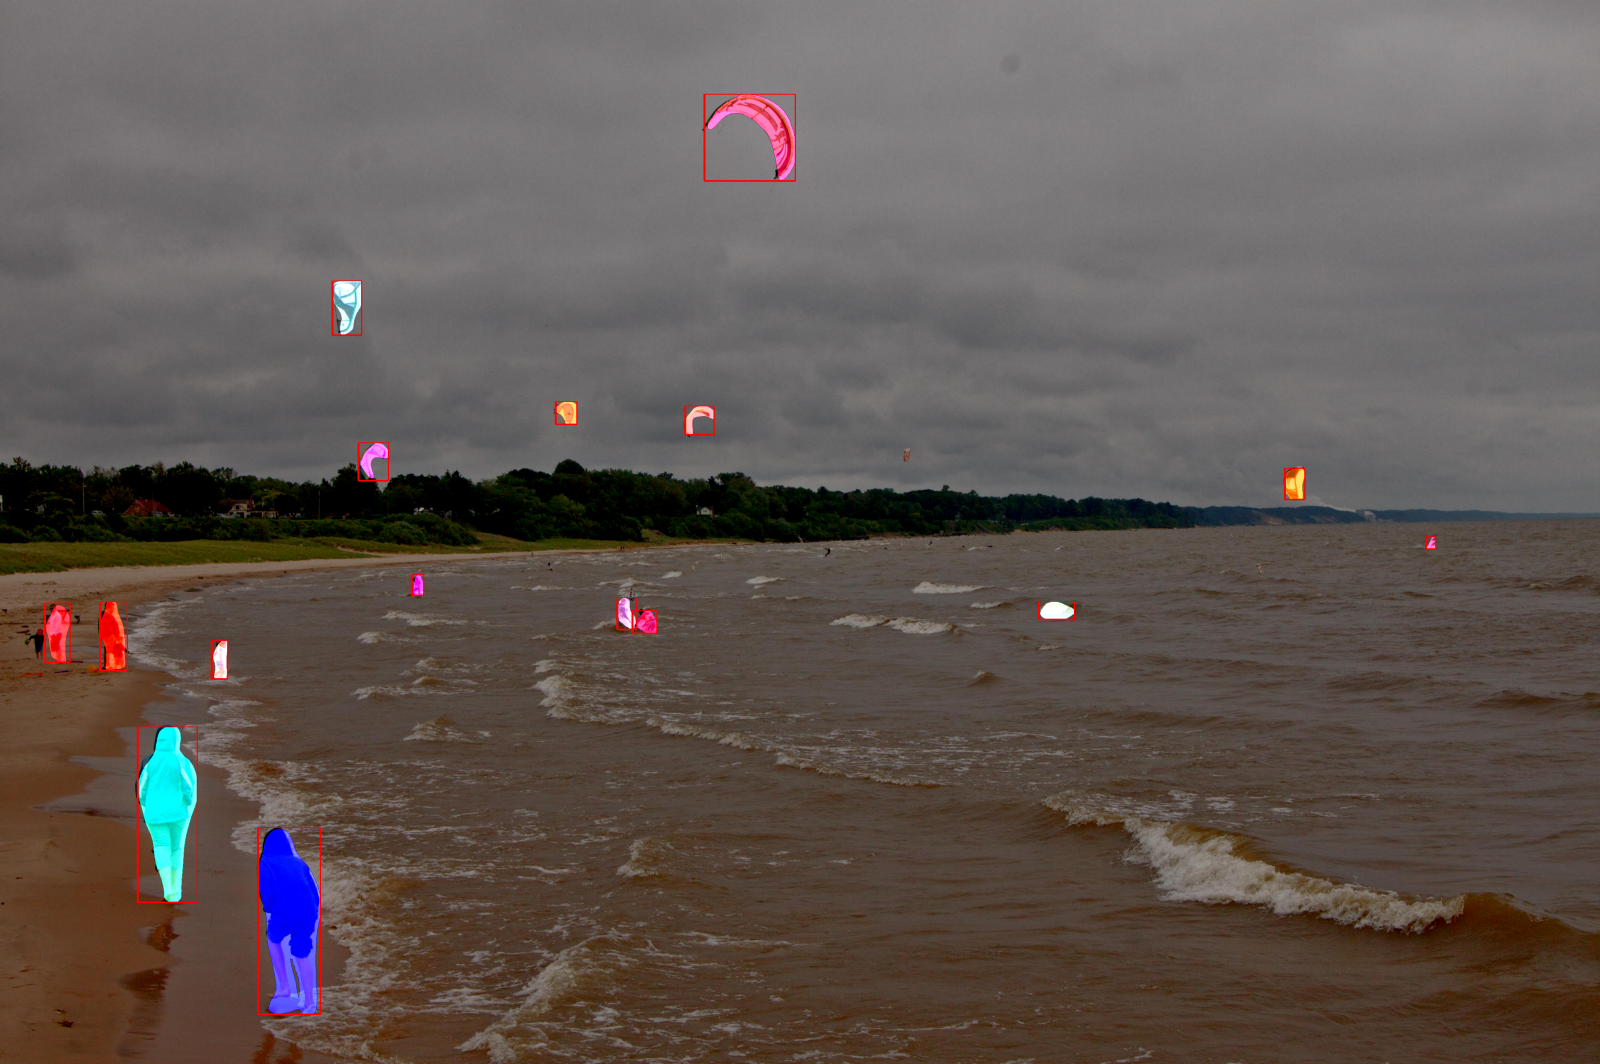
Testing on images
To test this model on images, you can leverage the code shared on the tensorflow website. I tested their most lightweight model — mask_rcnn_inception_v2_coco. Just download the model and upgrade to tensorflow 1.5 (this is important!). See sample result below:
Testing on videos
For me the more interesting exercise was to run the model on sample videos from youtube. I used keepvid to download a few videos from youtube. And I love the library moviepy for manipulating video files.
The main steps are:
- Use the VideoFileClip function to extract each frame from the video
- The fl_image function is an awesome function that can take an image and replace it with a modified image. I used this to run object detection on every image extracted from the video
- Finally all the modified clip images were combined into a new video You can find the full code on my Github.
Next Steps Couple of additional ideas for further exploration of this API:
- Try the more accurate but high overhead models and see how much of a difference they make
- Use the API to train Mask RCNN on a custom dataset. This is next on my to do list.
Other writings from Priya here!
References:

WorksHub
Jobs
Locations
Articles
Ground Floor, Verse Building, 18 Brunswick Place, London, N1 6DZ
108 E 16th Street, New York, NY 10003
Subscribe to our newsletter
Join over 111,000 others and get access to exclusive content, job opportunities and more!